Configuration
Pupilfirst LMS is configured by setting environment variables. The following list of environment variables are divided into Essential and Optional environment variables. All essential variables must be set for the application to function properly.
Essential
Basic configuration
# Set to your web application's Fully Qualified Domain Name (FQDN).
ASSET_HOST=https://fully-qualified.domain-name.com

# URL to PostgreSQL database.
DATABASE_URL=postgresql://username:password@host:port/database?sslmode=require

# This will be the default email address used in the 'from' field of outbound emails.
DEFAULT_SENDER_EMAIL_ADDRESS=noreply@domain-name.com

# Languages that are available, and the default language.
I18N_AVAILABLE_LOCALES=en,ru
I18N_DEFAULT_LOCALE=en

RAILS_ENV=production
RAILS_SERVE_STATIC_FILES=true

# Generate this value from the command line using `rake secret`.
SECRET_KEY_BASE=generate_using_rails_secret
Sending emails with Postmark
POSTMARK_API_TOKEN
POSTMARK_HOOK_ID
POSTMARK_HOOK_SECRET
To set up Pupilfirst to send transactional emails, you'll need to create a Postmark account, and add the POSTMARK_API_TOKEN environment variable with your account's API token.
Before proceeding with the next step, finish Postmark's account approval process, and make sure that outbound emails (such as sign-in emails) to domains other than your own are working.
Setting up the bounce and spam complaint webhook
You can configure Pupilfirst to block sending of emails to user addresses that are hard-bouncing, or where the users have complained that messages are spam. To do so, create a webhook once you've gotten outbound mails working.
- You can create webhooks by logging into your Postmark account, and heading to Servers > Your Server > Your Message Stream > Webhooks > Add Webhook.
- The webhook should be pointed to:
https://your.school.domain/users/email_bounce. - The Bounce and Spam Complaint options should be the events that are selected - there is no need to include the message content.
- Add some Basic auth credentials, and use those values to configure the
POSTMARK_HOOK_IDandPOSTMARK_HOOK_SECRETenvironment variables on Heroku.
File storage using AWS
AWS_ACCESS_KEY_ID=access_key_id_from_aws
AWS_SECRET_ACCESS_KEY=secret_access_key_from_aws
AWS_REGION=bucket_region_name
AWS_BUCKET=bucket_name_from_aws
To allow users to upload files, and to retrieve them, we'll use AWS's S3. The service has extensive documentation.
The following process is overly simplified, but is what you'll broadly need to do:
- Create a new S3 bucket to store uploaded files.
- Set up an IAM user with read & write permissions on the bucket.
- Configure Pupilfirst to use the newly created bucket using the correct credentials. Refer
AWS_*keys inexample.env.
Google reCAPTCHA
RECAPTCHA_V3_SITE_KEY
RECAPTCHA_V3_SECRET_KEY
RECAPTCHA_V2_SITE_KEY
RECAPTCHA_V2_SECRET_KEY
RECAPTCHA_DISABLED=false
Sign up for Google's reCAPTCHA service and generate both V3 (invisible) and V2 (visible) by supplying your application's FQDN.
If you wish to avoid using Google's reCAPTCHA (not recommended), you can set RECAPTCHA_DISABLED to true. This will disable the use of reCAPTCHA for public forms.
Web push notifications
VAPID_PUBLIC_KEY
VAPID_PRIVATE_KEY
To enable push notifications you will have to set mandatory environment variable VAPID_PUBLIC_KEY and VAPID_PRIVATE_KEY.
You can generate the keys by running the following commands on a Rails console:
vapid_key = WebPush.generate_key

# VAPID_PUBLIC_KEY
vapid_key.public_key

# VAPID_PRIVATE_KEY
vapid_key.private_key
Detailed Documentation: https://github.com/zaru/webpush#generating-vapid-keys
Defaults
Some essential variables (not listed elsewhere in this document) have defaults which should be changed depending on your requirements. The following are their defaults for the production environment:
# Timeout for general web requests.
SLOWPOKE_TIMEOUT=15

# The port that the server will listen on to receive requests.
PORT=3000
Optional
Setting up AWS CloudFront as a CDN for Private AWS Bucket
This section will guide you through the process of setting up AWS CloudFront to serve assets from a private AWS bucket.
Step 1: Creating a CloudFront Distribution
- Navigate to the AWS Console and select the CloudFront service.
- Click on Create Distribution.
- Select your desired AWS bucket from the list as the Origin.
Step 2: Configuring Origin Access
During the setup, follow the configuration as shown below.
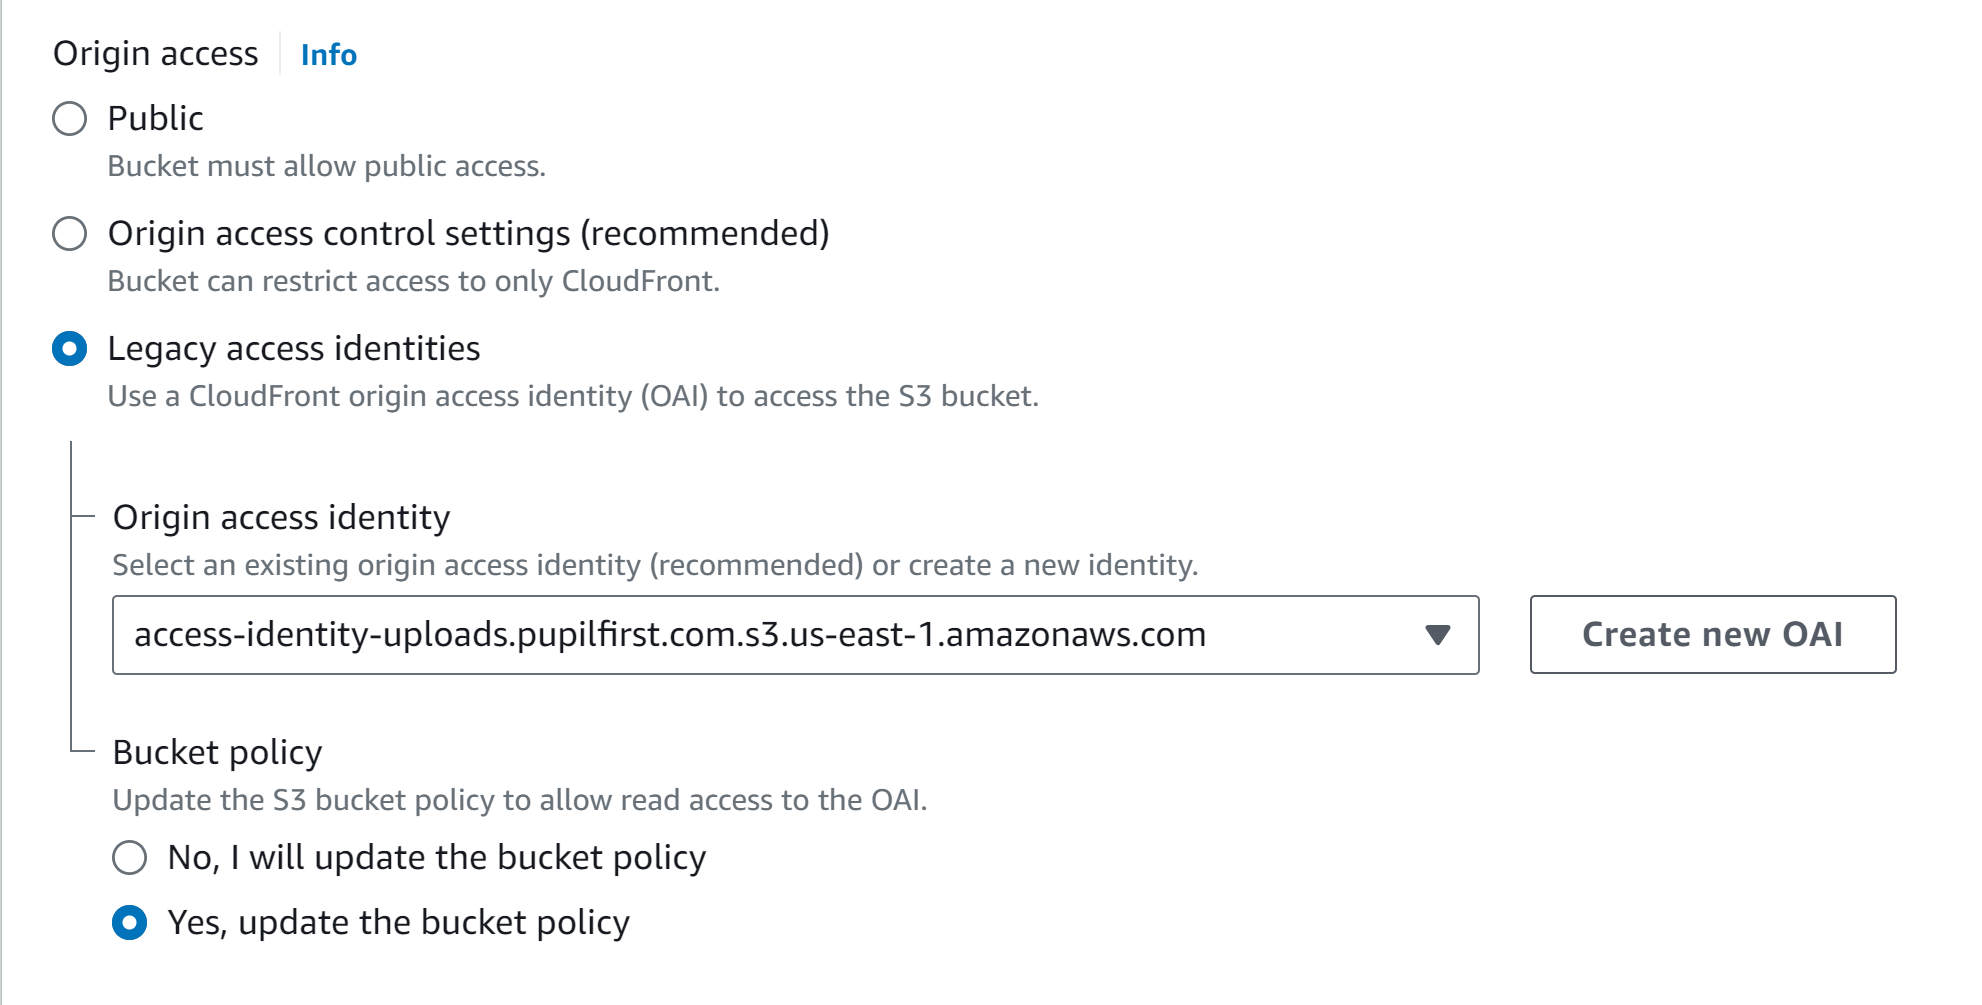
Note: On your first setup, ensure to select Yes, update the policy.
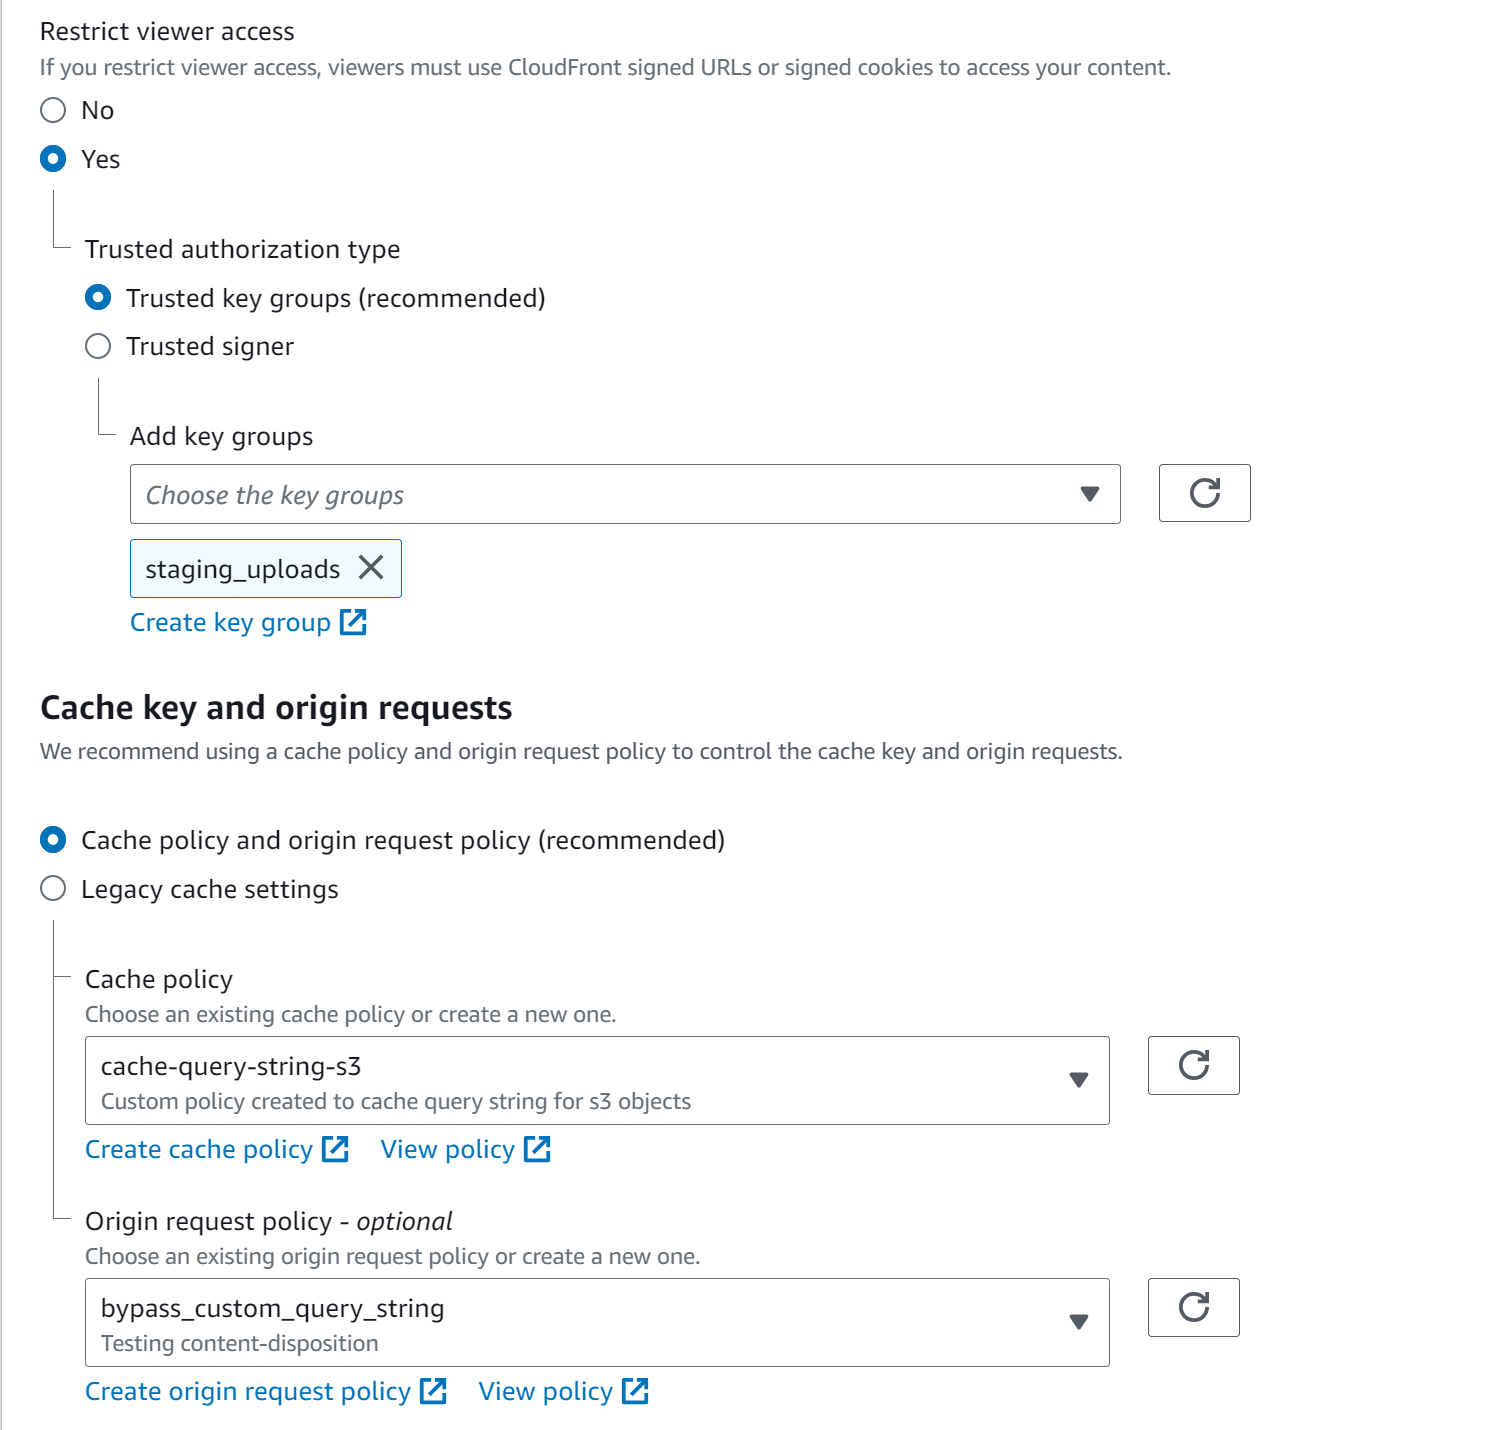
Step 3: Configuring Behaviours
For the most part, you can retain the default settings. However, the section below requires your attention. Refer to the screenshot below for more clarity:
Step 4: Creating Key Group and Public Key
Click on Create key group to generate a new group. To this group, you need to add a new public key. This key will be used to generate signed URLs to your resources in the bucket.
For detailed instructions on creating public keys and key groups, refer to the AWS documentation on creating CloudFront key pairs.
Step 5: Setting Environment Variables in your LMS application
You need to set the following environment variables:
# Bas64 encoded private key used for generating the cloudfront public key
CLOUDFRONT_PRIVATE_KEY_BASE_64_ENCODED=cloudfront_private_key_from_aws

# Cloudfront hostname
CLOUDFRONT_HOST=cloudfront_host_from_aws

# Cloudfront public key pair ID
CLOUDFRONT_KEY_PAIR_ID=cloudfront_key_pair_id_from_aws

# An integer in seconds used to compute the expiry time for the signed URL
CLOUDFRONT_EXPIRY=expiry_in_seconds
You can obtain the cloudfront_host_from_aws from the distribution you created. The cloudfront_key_pair_id_from_aws can be found in the key group window. It will contain the key pair id of the public key you added in the previous step.
To set CLOUDFRONT_PRIVATE_KEY_BASE_64_ENCODED, follow the steps below:
- Copy the contents of the
private_key.pemfile you obtained while creating the keys in Step 4. - Open the Rails console and encode the contents using
Base64.urlsafe_encode64(test). - Set the obtained value as the environment variable.
Sign in with OAuth
GOOGLE_OAUTH2_CLIENT_ID
GOOGLE_OAUTH2_CLIENT_SECRET
FACEBOOK_KEY
FACEBOOK_SECRET
GITHUB_KEY
GITHUB_SECRET
DISCORD_KEY
DISCORD_SECRET
SSO_DOMAIN
Warning: These instructions, for signing in with OAuth, are rough. This feature will need to be made configurable before its documentation can be expanded / re-written.
- Create OAuth apps for Google, Github, and Facebook, setting the redirect URI for each of these apps to
https://your.school.domain/users/auth/SERVICE/callback, where service is one ofgithub,facebook, orgoogle_oauth2. - Set credentials for OAuth apps - the required environment variables and listed above, and inside
example.env. - Set the
SSO_DOMAINenvironment variable to your fully qualified domain name (your.school.domain, for example).
Rollbar
ROLLBAR_CLIENT_TOKEN
ROLLBAR_SERVER_TOKEN
Rollbar can be used to monitor both server-side and client-side errors. Because of this, two separate tokens are required:
- Set
ROLLBAR_SERVER_TOKENwith your project'spost_server_itemaccess token. - Set
ROLLBAR_CLIENT_TOKENwith your project'spost_client_itemaccess token.
You can find both of these tokens by going to your project's Settings > Project Access Tokens.
Performance and error monitoring with New Relic
NEW_RELIC_LICENSE_KEY
To enable performance and error monitoring with New Relic, sign up for a New Relic account and configure its credentials using the NEW_RELIC_LICENSE_KEY key.
API rate limiting
GRAPH_API_RATE_LIMIT
GRAPH_API_RATE_PERIOD
REDIS_URL
At minimum, to enable rate limiting on the API, you need to set the REDIS_URL to a Redis connection string. The _LIMIT and _PERIOD keys default to 300 requests per 60 seconds.
Direct Upload to Vimeo
VIMEO_ACCESS_TOKEN
VIMEO_ACCOUNT_TYPE
To enable direct uploads to a Vimeo account from the curriculum editor, add the VIMEO_ACCESS_TOKEN and VIMEO_ACCOUNT_TYPE (basic, plus, pro, business, premium) environment variables.
Make sure that the access token has the following scopes enabled:
privatecreateedituploadvideo_files
Note: You cannot upload private videos if your Vimeo account type is
basic.
Alerts for repeated submission rejection by bots
If you're using the API to review and reject submissions, it's possible that students may repeatedly submit values that get rejected by automation. To be notified of such events, so that you can manually intervene, set the following two environment variables to notify all human coaches in a course about a bot repeatedly rejecting submissions.
# Comma-separated IDs of bot coaches (`faculty` table) members used to review submissions.

BOT_EVALUATOR_IDS=1,2,3

# Every n-th rejected submission by a bot will trigger an email to all non-bot coaches in a course.

BOT_EVALUATOR_REPEAT_REJECTION_ALERT_THRESHOLD=4
To deactivate this feature, simply avoid setting the BOT_EVALUATOR_IDS environment variable, or set BOT_EVALUATOR_REPEAT_REJECTION_ALERT_THRESHOLD to zero.
Scheduled jobs
If you're setting up a scheduler process with PROCESS_TYPE=scheduler, you can customize the schedule used to run these rake tasks:
# This is the default configuration, which will run each task daily at midnight, server-time.
SCHEDULE_CLEANUP="0 0 0 * * * *"
SCHEDULE_DAILY_DIGEST="0 0 0 * * * *"
SCHEDULE_NOTIFY_AND_DELETE_INACTIVE_USERS="0 0 0 * * * *"
Documentation of the schedule's format can be found in supercronic's README file.
Session-related
These values, in minutes, controls how long the corresponding one-time links sent to users remains active.
RESET_PASSWORD_TOKEN_TIME_LIMIT=15
LOGIN_TOKEN_TIME_LIMIT=15
You can also configure the maximum number of attempts allowed for OTPs.
INPUT_TOKEN_MAX_ATTEMPTS=5
School Specific Configuration
LMS allows you to configure specific settings for a school using various integrations such as Discord, Email Sender Signature, Vimeo, and Github. The following documentation describes how to set up the configurations field in school model.
Email Sender Signature Configuration
To set up the Email Sender Signature integration, provide the following keys in the email_sender_signature object:
- name: The name of the email sender.
- email: The email address of the email sender.
- confirmed_at: The date and time when the email address was confirmed (in ISO 8601 format). Example:
"email_sender_signature": {
  "name": "John Doe",
  "email": "john.doe@example.com",
  "confirmed_at": "2023-05-10T00:00:00Z"
}
Vimeo Configuration
To set up the Vimeo integration, provide the following keys in the vimeo object:
- account_type: The Vimeo account type (e.g., "basic", "plus", "pro", "business", or "premium").
- access_token: The Vimeo API access token.
Example
"vimeo": {
  "account_type": "pro",
  "access_token": "your_access_token"
}
Github Configuration
To set up the Github integration, provide the following keys in the github object:
- access_token: The Github API access token.
- organization_id: The Github organization ID.
- default_team_id: The default Github team ID to be added to a repository. Example:
"github": {
  "access_token": "your_access_token",
  "organization_id": "your_organization_id",
  "default_team_id": "your_default_team_id"
}
General Options
disable_primary_domain_redirection: Set this to true if you want to disable primary domain redirection. Default is false.
delete_inactive_users_after: Set the number of days after which inactive users should be deleted. For example, 30 would delete inactive users after 30 days.
Example:
"disable_primary_domain_redirection": true,
"delete_inactive_users_after": 30
All of these configurations are optional. You can provide any combination of these configurations in the school configurations field.
- change the default currency: Set the default currency for the school. Default is INR.
"default_currency": "USD"
Development
These are development-specific environment variables, which default to the values given below.
# Which driver to use when running tests. See `rails_helper.rb` for options.
JAVASCRIPT_DRIVER=headless_chrome

# In some environments, such as WSL, it may be useful to disable GPU when running tests.
JAVASCRIPT_DRIVER_DISABLE_GPU=false